Gitlab Runner with Ansible
In this post, I will continue discussing how to build a home lab that utilizes Infrastructure as Code through Terraform or Ansible, Proxmox, and GitLab.
A robust CI/CD deployment model for a platform consists of three key elements: a repository to store your code, a method to deploy your code, and the code itself. The repository where you store your code is commonly referred to as a "code repository" or simply "repo." This repository serves as a library for all your code. Two widely recognized code repositories are GitLab and GitHub. For the purpose of this guide, I will be using GitLab.
To effectively deploy our code, we often employ something called a "pipeline." A pipeline is a sequence of instructions that are executed when we upload code to our code repository. This pipeline's execution empowers us to automate the deployment of our code or the creation of our infrastructure. To run a pipeline within GitLab, a component known as a "runner" is required. In this blog post, I will delve into creating a GitLab runner that operates within our Proxmox environment using Ansible. This runner will be a valuable asset for upcoming blog posts, providing us with a dedicated platform to execute pipelines and deploy our Kubernetes nodes and infrastructure.

Previous blog post in this series: IaC in my home lab
In my previous post, I discussed the deployment of a virtual machine (VM) to a Proxmox server using the Terraform script we created.
Note: While working with the Proxmox Terraform provider, I've come to realize that to achieve my goal of maximizing automation and staying aligned with Proxmox for VMs, integrating Ansible with Proxmox will bring me closer to the desired state.
In this blog post, I will delve into implementing an Ansible playbook for deploying a VM and configuring it as a GitLab runner using Infrastructure as Code. Given that we're utilizing the Proxmox server for VM execution, we'll need to implement changes that facilitate effective communication between Ansible and Proxmox. Once we've configured the Proxmox server to collaborate with Ansible, the next step is to install Ansible on the host where we intend to run it.
Although you have the flexibility to run Ansible on any Linux host, for the purpose of this scenario, I'm using Windows Subsystem for Linux (WSL) on Windows for testing. Following the installation of Ansible on our Ubuntu distribution, we can initiate the process of crafting our playbook. This playbook, upon execution, will achieve the following tasks: create a Proxmox VM, append our public SSH keys to its authorized hosts file, and orchestrate the necessary adjustments to transform it into a GitLab runner. All of this will be accomplished seamlessly through Ansible.
All files for this post can be found at iac_in_my_home_lab_part_2
GitLab Prerequisites:
Before we proceed with creating a runner, there are a few prerequisites we need to have in place:
An account on GitLab.com: Make sure you have an active account on GitLab's public platform.
A private project: You'll need a private project where you intend to deploy the runner.
A runner registration token: This token is essential for runner setup and can be obtained from your project settings.
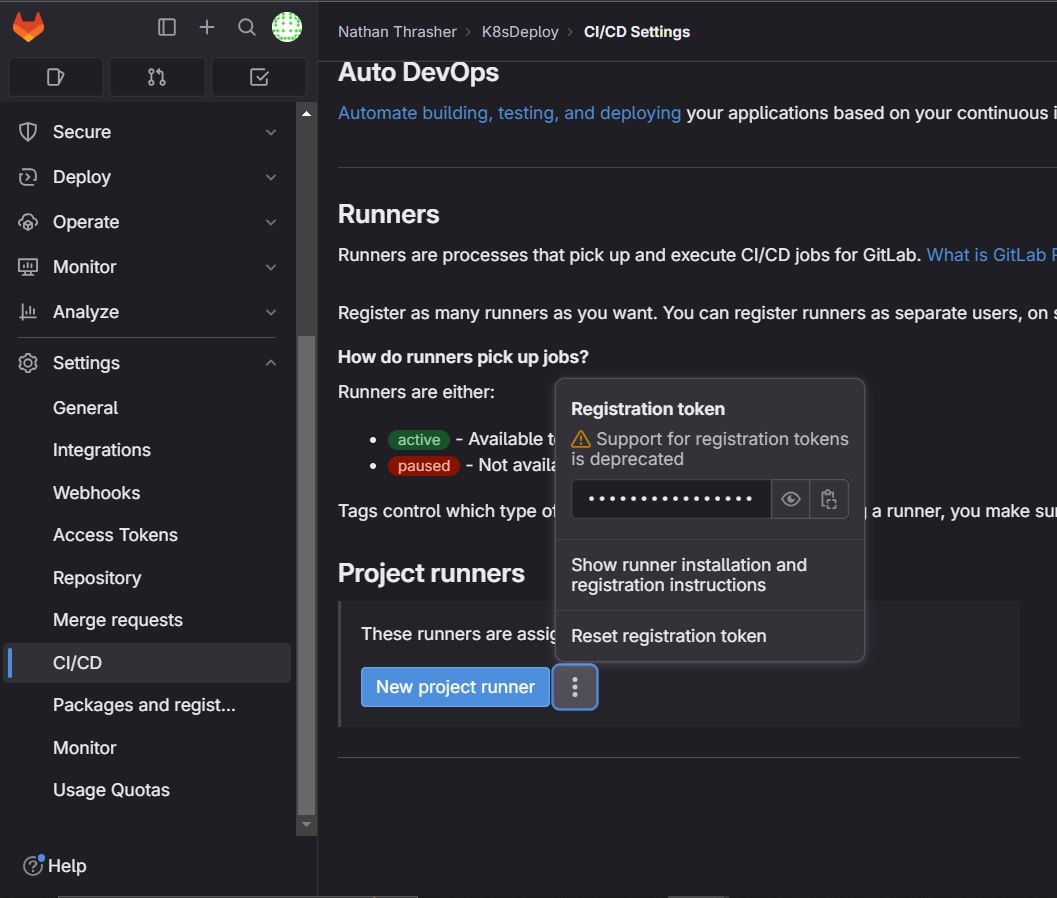
To find the registration token, follow these steps:
Project Settings: Navigate to your project's settings.
CI/CD: Within the settings, locate and click on the CI/CD section.
Runners: Under the CI/CD settings, select the "Runners" option.
Obtaining the Token: To access the runner registration token, click on the three dots adjacent to "New Project Runner." This will unveil the registration token you need.
Make sure you have these prerequisites ready before proceeding further.
Changes to Make on Proxmox:
To establish a connection between Proxmox and Ansible, we need to install proxmoxer. You can achieve this by utilizing Python's package manager, pip. If you're using a Linux-based system, there's a high chance that a version of Python is already included.
To verify if Python is installed on your system, execute the following command:
python --version
To proceed with the installation of proxmoxer on your Proxmox node, execute:
python -m pip install proxmoxer
Note: If you encounter an error related to external management of Python packages, you can consider the following command at your own discretion:
python -m pip install proxmoxer --break-system-packages
Please be cautious while using the --break-system-packages flag.
Install Ansible on Your Linux Instance
To get started, you need to install Ansible on your Linux instance. The official documentation provides detailed instructions on how to do this:
Create a Proxmox VM Template
Execute the commands below on your Proxmox node to create the VM template that will serve as the basis for future deployments.
Before you proceed, ensure that the /root/pc_id_rsa.pub file containing the public SSH key for the machine from which you'll execute the Ansible playbook is created.
wget https://cloud-images.ubuntu.com/bionic/current/bionic-server-cloudimg-amd64.img

qm create 9002 --memory 2048 --net0 virtio,bridge=vmbr0 --scsihw virtio-scsi-pci

qm set 9002 --scsi0 local-lvm:0,import-from=/root/bionic-server-cloudimg-amd64.img

qm set 9002 --ipconfig0 ip=dhcp --agent enabled=1 --ciuser ubuntu --cipassword ubuntu --serial0 socket --vga serial0 --boot order=scsi0 --ide2 local-lvm:cloudinit

qm set 9002 -sshkey /root/pc_id_rsa.pub

qm disk resize 9002 scsi0 10000M
qm start 9002
Connect to the terminal of the deployed VM:
qm terminal 9002
Inside the VM, execute the following commands:
sudo apt install qemu-guest-agent -y
sudo systemctl start qemu-guest-agent
sudo systemctl enable qemu-guest-agent
After exiting the VM, stop it and convert it into a template:
qm stop 9002
qm template 9002
Ansible Playbook
Building the Playbook to Create a VM on Proxmox:
Create a directory named create-runner for our runner playbook. Within this directory, create two files: hosts.yml and create-runner.yml.
mkdir create-runner
touch create-runner/hosts.yml
touch create-runner/create-runner.yml
Next, let's start building the Ansible hosts.yml file. This file is used by Ansible to identify hosts and define variables that can be utilized within the playbook.
Below is the content of hosts.yml:
proxmox:
  hosts:
    PROXMOX_IP:
      ansible_user: PROXMOX_USERNAME
      proxmox:
        api_user: PROXMOX_USER
        api_password: PROXMOX_PASSWORD
        api_host: PROXMOX_IP
        node_name: PROXMOX_NODE_NAME
      runner:
        template_name: VM_TEMPLATE_NAME
        gw: NETWORK_DEFAULT_GATEWAY
        ip: RUNNER_IP
        vm_name: RUNNER_NAME
        registration_token: RUNNER_TOKEN
Make sure to replace the placeholders with the correct values:
- PROXMOX_IP: Replace with your Proxmox server's IP address.
- PROXMOX_USERNAME: Your Proxmox login username (root or other).
- PROXMOX_USER: Proxmox user for the operations.
- PROXMOX_PASSWORD: Your Proxmox password.
- PROXMOX_NODE_NAME: Name of the Proxmox node (usually 'pve').
- VM_TEMPLATE_NAME: The name of your earlier created template (e.g., "VM 9002").
- NETWORK_DEFAULT_GATEWAY: The default gateway of your network.
- RUNNER_IP: The IP address assigned to the runner VM.
- RUNNER_NAME: The desired name for the runner VM.
- RUNNER_TOKEN: The token for registering the GitLab runner.
Next, let's create the create-runner.yml playbook:
---
# create-runner.yml

- name: 'Deploy our Cloud-init VMs'

  hosts: proxmox
  tasks:

# Clone proxmox vm template

  - name: 'Clone template - {{ runner.vm_name }}'
    community.general.proxmox_kvm:
      node: '{{ proxmox.node_name }}'
      name: '{{ runner.vm_name }}'
      clone: '{{ runner.template_name }}'
      api_user: '{{ proxmox.api_user }}'
      api_password: '{{ proxmox.api_password }}'
      api_host: '{{ proxmox.api_host }}'
      timeout: 90

# Update proxmox vm ip address

  - name: 'Update {{ runner.vm_name }} ip'
    community.general.proxmox_kvm:
      node: '{{ proxmox.node_name }}'
      name: '{{ runner.vm_name }}'
      ipconfig:
        ipconfig0: "ip={{ runner.ip }}/24,gw={{ runner.gw }}"
      api_user: '{{ proxmox.api_user }}'
      api_password: '{{ proxmox.api_password }}'
      api_host: '{{ proxmox.api_host }}'
      update: true

# Start proxmox vm

  - name: 'Start VM {{ runner.vm_name }}'
    community.general.proxmox_kvm:
      node: '{{ proxmox.node_name }}'
      name: '{{ runner.vm_name }}'
      api_user: '{{ proxmox.api_user }}'
      api_password: '{{ proxmox.api_password }}'
      api_host: '{{ proxmox.api_host }}'
      state: started

# Add vm ip address to group just_created in ansible inventory

  - name: 'Add host {{ runner.vm_name }} to group just_created'
    ansible.builtin.add_host:
      hostname: '{{ runner.ip }}'
      groups: just_created


- name: add host keys
  hosts: just_created
  gather_facts: no
  tasks:

# Remove existing public ssh keys for runner ip in known_hosts

  - name: run ssh-keyscan to remove keys in known_hosts
    local_action: shell ssh-keygen -f ~/.ssh/known_hosts -R "{{ inventory_hostname }}"
    retries: 10
    delay: 3
    register: result
    until: result.rc == 0

# Add public ssh key for deployed runner vm in known_hosts

  - name: run ssh-keyscan to add keys in known_hosts
    local_action: shell ssh-keyscan {{ inventory_hostname }} >> ~/.ssh/known_hosts
    retries: 10
    delay: 4
    register: result
    until: result.rc == 0
Add to playbook to configure the vm to act as a gitlab runner:
Add the following to the bottom of the create-runner.yaml This will shell into the runner and execute the commands to install the gitlab runner and register it as a runner on our gitlab project.
Make sure to replace the PROXMOX_IP with the IP address of the proxmox server you are running.
- name: building runner
  hosts: just_created
  tasks:

  - name: install gitlab runner
    ansible.builtin.shell: |
      sudo curl -L --output /usr/local/bin/gitlab-runner https://gitlab-runner-downloads.s3.amazonaws.com/latest/binaries/gitlab-runner-linux-amd64
      sudo chmod +x /usr/local/bin/gitlab-runner
      sudo useradd --comment 'GitLab Runner' --create-home gitlab-runner --shell /bin/bash
      sudo gitlab-runner install --user=gitlab-runner --working-directory=/home/gitlab-runner
      sudo gitlab-runner start
      sudo gitlab-runner register --url https://gitlab.com/ --registration-token {{ hostvars['PROXMOX_IP']['runner']['registration_token'] }} --executor shell --non-interactive
Running your ansible playbook:
To run the playbook, execute the following command:
ansible-playbook create-runner/create-runner.yml -i playbook/create-runner/hosts.yml
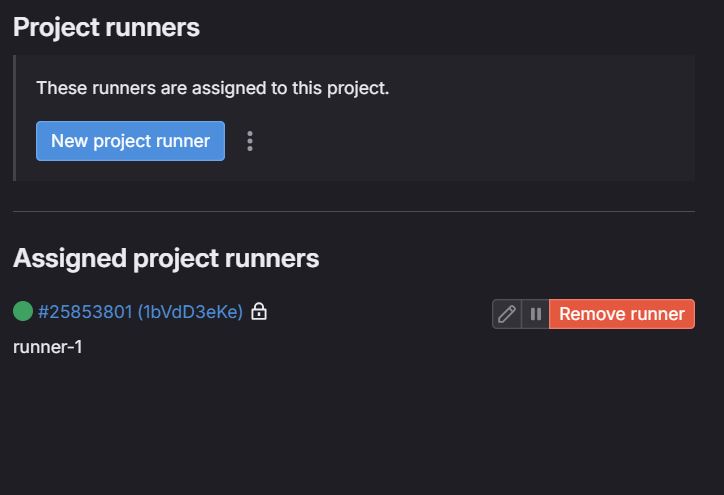
Once the pipeline runs successfully, you'll see the GitLab runner registered under the runner settings in the GitLab GUI.
Conclusion
By the end of this tutorial, you should have a functional runner within your GitLab project, ready for future infrastructure deployments in your Proxmox environment. This marks a significant step towards achieving a fully automated home lab platform.
Thank you for dedicating your time to read my blog.