My First K8s App
Journey from application to K8s implementation
The other day, I was talking to a friend of mine trying to explain to him the purpose of K8s. He understood things like, "yeah, we have a cluster which has nodes and runs things like pods in the form of deployments, replica sets, etc." He understood the objects inside of K8s and more or less different structural pieces that make K8s work as a whole but was perplexed when it comes to "Apps" - where do they run? Do they exist in a pod, a container, what is a container, etc.? What is the point of it all?
I feel the easiest way to understand all of this is to start at the beginning.
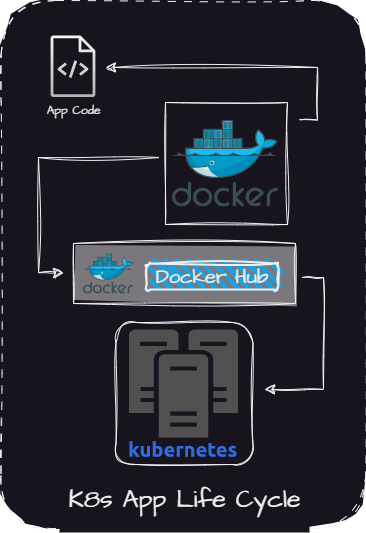
How do we get from app to container and container to cluster and cluster to browser?
In this blog, I will take you through:
- Creating a basic hello world python application
- Packaging that application into a Docker image
- Pushing that Docker image into a registry
- Deploying docker image in a pod in the Kubernetes cluster
- Exposing the cluster to a browser allowing us to access it outside of the cluster
- Packaging all of the YAML manifests into a Helm chart allowing us to easily deploy the app in the future.
Along this journey, I intend on explaining things like:
- What is a Docker container?
- Why do we need to use containers?
Hopefully, at the end of this, you have a better understanding of how applications go from inception to running on Kubernetes.
Creating the App
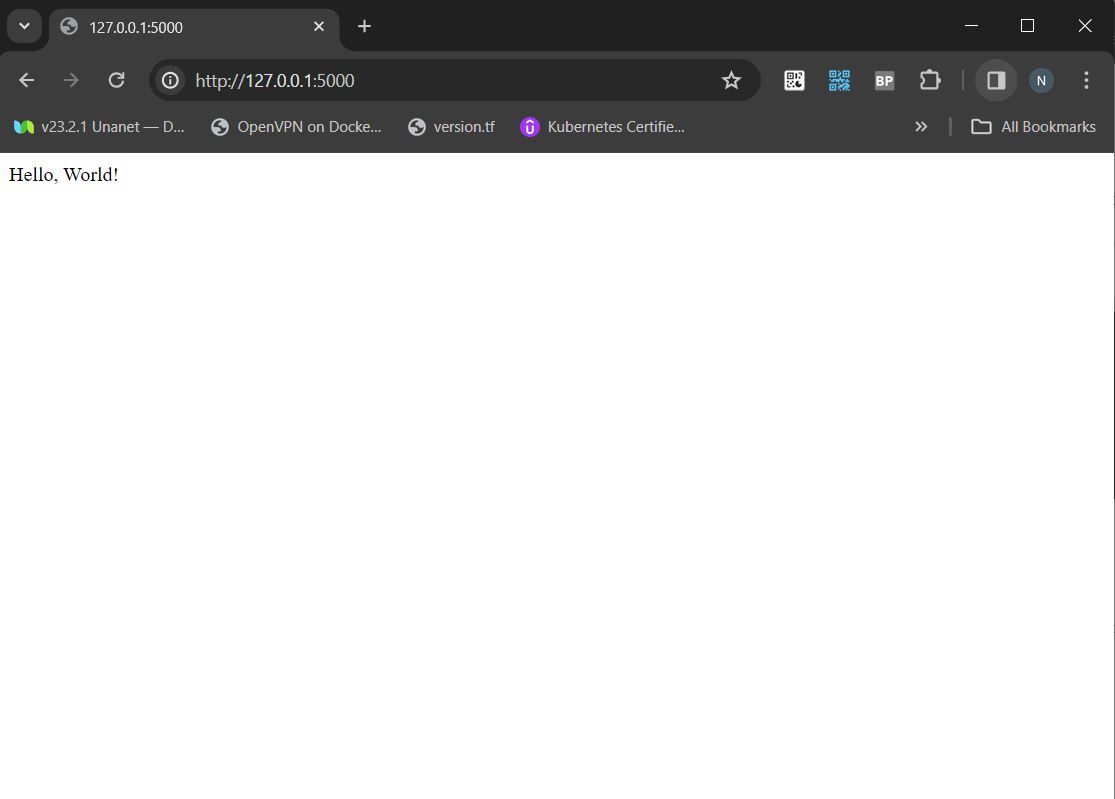
app.py
from flask import Flask

app = Flask(__name__)

@app.route('/')
def hello_world():
    return 'Hello, World!'

if __name__ == '__main__':
    app.run(host='0.0.0.0', port=5000, debug=True)
This is the source code we will be using for our hello world application. If you run this python code in your current environment, it will spin up a basic web server over 127.0.0.1:5000 on your local system, and when we go to the address of 127.0.0.1:5000 in our browser, we will see "Hello world."
So what is the problem here? We have an application running what we want; why would we need to do anything else? There is no problem with this if we are running this on our computer, as we have already seen.. It Works! But what if we want it to run on Joe Shmoe's computer, Larry Su's, or the guy who lives down the street who just irks you? We now have a problem because you have Python installed on your computer and you have installed the required Python package of Flask that Python requires to run your application. These are called dependencies; this is because our application depends on them to run. And as I'm sure you are aware Joe, Larry, and the guy down the street don't have these dependencies installed on their computer. It's not like we can just take all of those dependencies plus our application and throw them in a container that we could just give away..

.. but what if we could?
This is what Docker containers are for and what they do. The container packages up all of our necessary dependencies plus our application so that we can run it anywhere Docker or our container runtime is installed. This makes it super easy to distribute our application without having to worry about all of those dependencies.
Making the App into a Docker Image and Running it as a Docker Container
To build our Docker image we must have Docker installed on our system How to install Docker
To package our application as a Docker container, we will need the file above app.py, a requirements.txt file, and a Dockerfile.
requirements.txt
flask
Dockerfile
# Use an python base image
FROM python:3.8-slim

# Set the working directory in the container
WORKDIR /app

# Copy the current directory contents into the container
COPY . /app

# Install any needed packages specified in requirements.txt
RUN pip install --no-cache-dir -r requirements.txt

EXPOSE 5000

# Run the application
CMD ["python", "app.py"]
build.sh
#Docker image build script
image_name=imagename

docker build -t $image_name .
File Structure:
app(directory)
|--- app.py
|--- Dockerfile
|--- build.sh
|--- requirements.txt
To build our Docker image, we need to run the build.sh script in our app directory.
Pushing Docker Image to a Docker Registry
In order to push our image to a Docker registry, we must have a hub.docker.com account and an image repo on Docker Hub
Once we have run build.sh to build our Docker image, we need to push it to our Docker registry.
To do this, we need to first log in to the Docker registry with our Docker Hub account.
docker login
# docker login will prompt you for a username and password so you can login
Once we have logged in, we are now ready to push our Docker image to the registry we created. We can do that with the command below.
docker push imagename
# This will only work if your image has the same name as your docker repo
So this is all well and good, but what if we have an application that requires multiple Docker images that run at the same time? Though it is possible to run multiple containers at the same time on something such as Docker, it can get messy.

.. gross
We need structure. We need organization .. we need a place built for storing containers like a warehouse. We need to be able to separate apps that run on multiple containers from other apps that run on multiple containers.

Here comes in Kubernetes. Kubernetes is a platform built to run multiple containerized applications at the same time. Each of our containers runs within these Kubernetes objects called pods. Pods can talk to other pods in the case of an application that needs to run multiple containers. We can even separate these multiple container applications from other multiple container applications in these things called namespaces. Namespaces act as a logical boundary around a group of objects in K8s from objects in other Namespaces. This does not provide a security benefit but it does provide order, and we need order!

Turning your Docker Application into K8s Manifest
any reference to natrufthr/helloworld:v3 can be replaced with the Docker image you have built and pushed to Docker Hub in the previous step
# create a hw directory to save k8s manifest
# we will use this when we build a Helm chart later

mkdir hw

#create namespace for application
kubectl create ns hw

#create application deployment
kubectl -n hw create deployment hw --image=natrufthr/helloworld:fail --replicas=1 -o yaml > hw/deployment.yaml

#expose application to your network

kubectl -n hw expose deployment hw --port 5000 --type NodePort -o yaml > hw/np-svc.yaml

# To view created node port service

kubectl -n hw get svc hw
Now that we have our namespace, our deployment, and our service to expose our application we should next check our pods status with:
kubectl -n hw get pods

# You should see an errimage pull back on your pod if you used the image I had above
# This was done on purpose to show you a feature of deployments
Our K8s environment is having an issue pulling our image because it does not exist. When you create a deployment in K8s, it also creates a replicaset and then the replicaset will deploy your pods. You can think of it like this: The deployment manages replicasets and the replicasets manage pods. This makes it easier to roll out changes in our cluster, because we can update the deployment, then this will create a new replicaset and a new pod. Kubernetes then waits for our pod to go to a ready state prior to removing our old pod in an error state. We also have the ability to rollback to our previous replicaset if we choose to as well.
To fix our error update the deployment image with the command:
kubectl -n hw set image deployment hw helloworld=natrufthr/helloworld:v3
We should now be able to watch the new pod be switched out for the old image by:
watch kubectl -n hw get po # this may take a minute to complete
# If pod status is running the image has already been switched
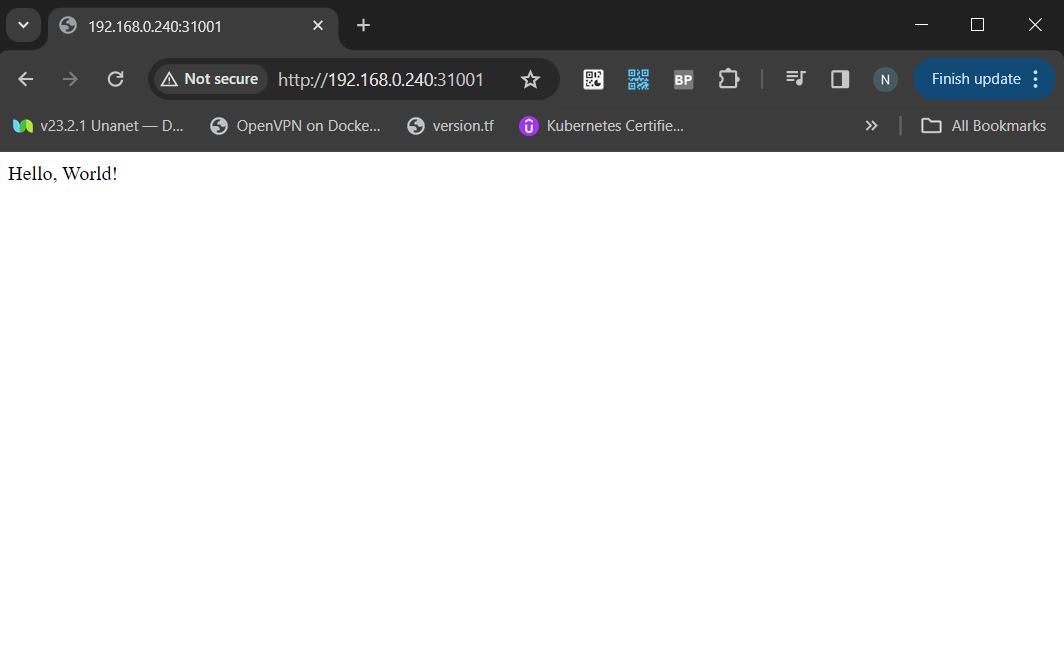
Because we are exposing the application to our network using a NodePort we need to know 2 things:
- What is the IP address of the node your pod is running on
- What is the NodePort our pod is running on
# To view the name of the node your Pod is running on:
kubectl -n hw get pods -o wide

# by adding "-o wide" to our command under node it will show what node the
# pod is running on

# To view the nodes ip address:
kubectl get nodes -o wide

#To view the service NodePort:
kubectl -n hw get svc -o yaml | grep nodePort
You should now be able to curl the application with curl http://(NodeIp):(NodePort) as well as view the application with this URL locally provided there are no firewalls preventing you from doing so.
Packaging Application up with Helm to Deploy in the Future
To build our Helm chart we must have Helm on our system How to install Helm
Before we create our Helm chart, we need to update the image in the deployment file we created earlier:
# updates deployment manifest to correct image
kubectl -n hw create deployment hw --image=natrufthr/helloworld:v3 --replicas=1 --dry-run=client -o yaml > hw/deployment.yaml
Now that we have our YAML manifests prepared, we can begin creating our Helm chart. By having a Helm chart, we will be able to deploy our app in a repeatable non-manual fashion.
To build and update chart execute the below commands:
helm create chart # creates helm chart folder named chart
rm -rf chart/charts
rm -rf chart/templates

cp -rf hw chart/templates #copying directory with your yaml manifests into helm chart
Our Helm chart is now ready to deploy so let's delete our app and deploy it with Helm:
#delete deployment with
kubectl delete ns hw #this may take a minute
To deploy the chart, you can execute the following command:
helm install hw ./chart --namespace hw --create-namespace
This will create a new namespace named hw and deploy your app to that namespace
To view our deployed objects in K8s:
kubectl -n hw get all
To uninstall the chart, you can execute the following command:
helm uninstall hw ./chart --namespace hw
You now have an automated way of deploying your basic hello-world application via Helm.
In a real-world scenario, using node ports to expose applications in Kubernetes is not optimal. It is more effective to use something like Nginx or Istio to expose web applications. In my next blog titled Nginx vs Istio, I will be discussing this more in-depth.